Scan the QR to call
Process
- Home
- About Us
- Process
Shipping Container construction Process
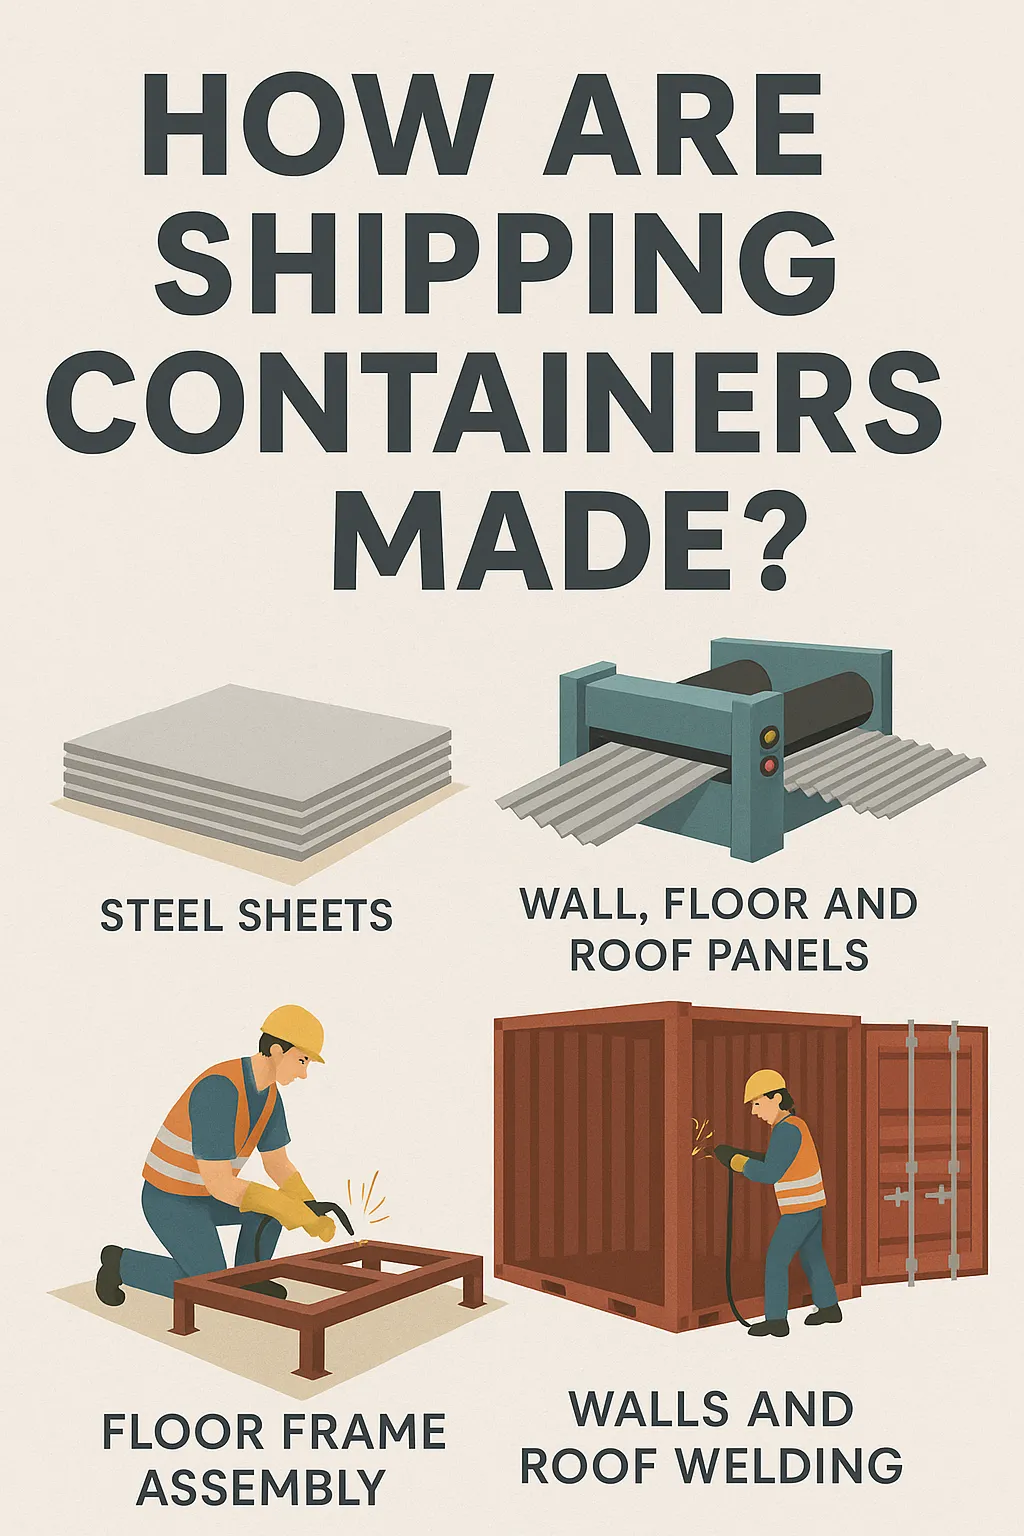
Many people assume that shipping containers are built entirely by machines, but in reality, the process involves a fair amount of manual labour. The manufacturing starts with large sheets of Corten steel, chosen for its durability and corrosion resistance. These sheets are cut into specific sizes and corrugated to enhance strength and durability.
Next, the steel panels for the walls, floor, and roof are welded together by skilled workers to form the basic container structure. The floor frame is assembled first, followed by the side walls, doors, and roof. After the structure is complete, it undergoes sandblasting, priming, and painting to withstand harsh weather and marine conditions.
Durable marine-grade plywood is then installed as the container’s flooring. Finally, every container passes through strict quality control checks to ensure it meets international shipping standards. This blend of advanced machinery and hands-on expertise ensures containers remain reliable and secure worldwide.
-
Step 01Raw Material Handling & Initial Quality ControlThe manufacturing begins with the receipt, transportation, and secure storage of raw materials, primarily steel sheets. These materials undergo thorough visual, dimensional, and mechanical property checks to ensure they meet required specifications such as grade, thickness, chemical composition, and tensile strength. Variations like incorrect grade, rust, or out-of-spec properties are identified at this stage to prevent non-conformities downstream.
-
Step 02D-Coiling & Sheet PreparationCoils are de-coiled, straightened, and cut into specified dimensions using conveyor and cutting systems. Precision is vital to ensure correct thickness, width, and surface finish. Errors such as stopper misalignment, operator mistakes, and material faults are managed here. This step prepares the sheets for forming and coating operations.
-
Step 03Shop Priming & Surface ProtectionThe cut sheets receive a primer coat to prevent corrosion and ensure better adhesion for subsequent paint layers. Key factors include maintaining consistent dry film thickness and paint viscosity. Any irregularity in coating, such as runs or patchiness, is corrected here to maintain surface protection.
-
Step 04Roll Forming, Laser Cutting & BendingThe primed sheets are shaped into container parts through roll forming, which defines specific profiles and bend angles. This is followed by precise laser cutting or shearing to match design specifications. Final bends are made using press brakes. Common issues like burrs, misalignment, and improper forming are carefully managed using back gauge positioning, roll angles, and cutting parameters.
-
Step 05Sub-Assembly & WeldingFormed components like sidewalls, roof, doors, and base are welded into sub-assemblies. Attention is paid to part fitment, angle accuracy, and weld quality. Welding parameters such as gas flow, wire feed speed, and voltage are controlled to ensure strong and uniform joints. Post-welding, surface finishing is carried out to remove burrs and weld spatter.
-
Step 06Boxing, Cubing & Final WeldingSub-assemblies are joined to form the complete container box. Fixtures ensure alignment of diagonals, dimensions, and panel flatness. The assembled structure is then fully welded to unify the body. Full weld penetration, clean bead appearance, and dimensional accuracy are critical. Grinding is performed again to eliminate post-weld imperfections.
-
Step 07Final Inspection & Surface CleaningOnce the container body is complete, a comprehensive inspection is done to verify weld integrity, dimensions, and finish. Any visual or mechanical defect is rectified before moving ahead. Shot blasting is then carried out to remove rust, oil, or scale, creating a uniform surface texture ideal for painting.
-
Step 08Painting – Primer, Intermediate & Top CoatsPainting is done in three stages: primer application, intermediate coat, and final top coat. Each layer is applied with controlled air pressure and paint viscosity to ensure uniform DFT and proper adhesion. This not only enhances appearance but also offers long-term corrosion resistance. Under-structure painting is given special attention due to environmental exposure.
-
Step 09Flooring – Plywood Fitment & Optional Chequered PlateMarine-grade plywood is fixed onto the container floor using self-tapping screws, ensuring flush fitment and moisture resistance. In specialized containers, a chequered plate is welded over the plywood for extra strength. Accurate welding parameters are used to avoid distortions and welding flaws.
-
Step 10Gasket & Locking Mechanism InstallationRubber gaskets are installed on doors for weather sealing, along with the DLM (Double Lock Mechanism) to ensure secure closure. Proper riveting and alignment are ensured for effective functionality and long-term durability.
-
Step 11Water Leak Test (Shower Test)The container is subjected to a simulated rain test using high-pressure water jets to confirm its water-tightness. Key parameters like nozzle pressure, distance, and coverage area are maintained to detect any leakage from joints, doors, or panels.
-
Step 12Final Quality Checks – PDI & TestingBefore dispatch, each container undergoes a Pre-Dispatch Inspection (PDI) that covers paint quality, welding integrity, surface finish, and dimensional accuracy, aligned with ISO 1496-1 standards. Additionally, one out of every 100 units (or as required) undergoes structural and functional testing for load handling, door operation, and sealing effectiveness.